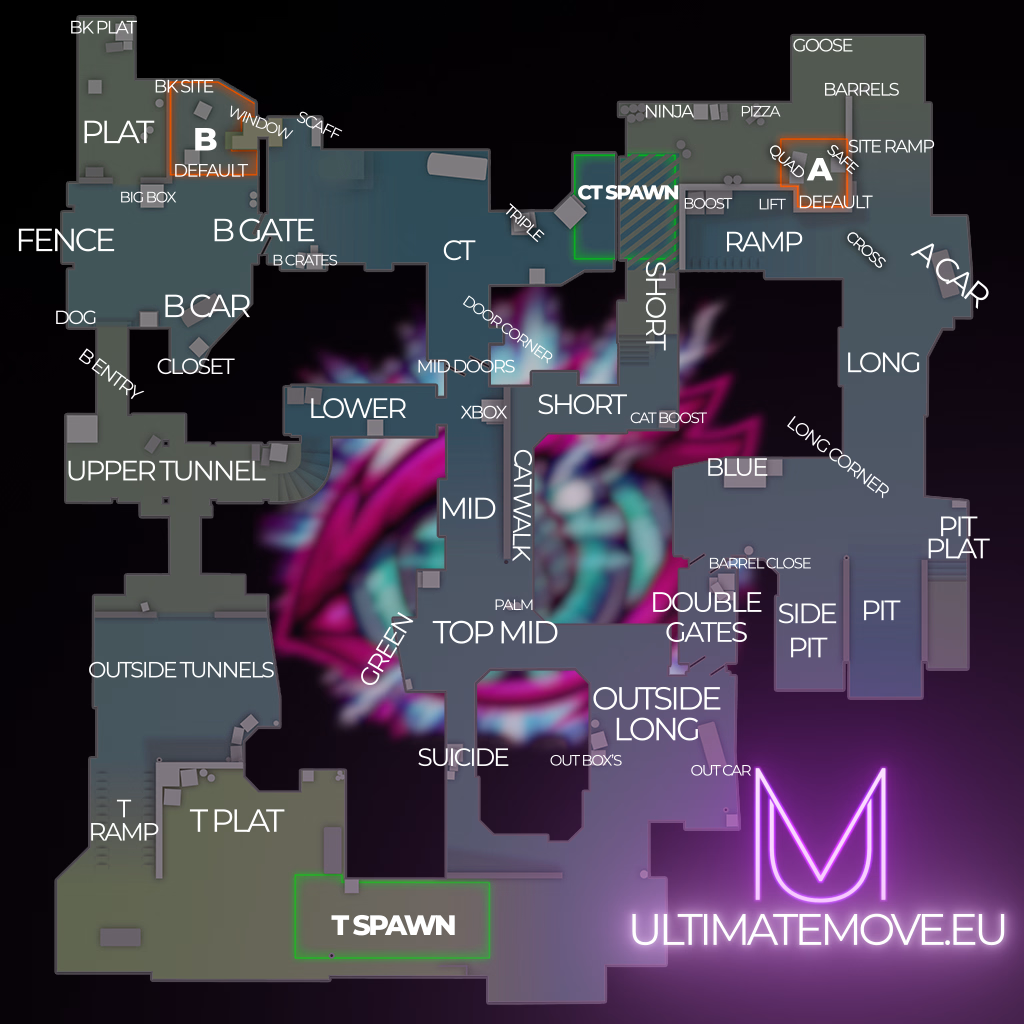






All Dust 2 callouts
A full list of positions by area, with the name variants you will hear in comms. The same spot goes by different names in different lobbies, so we give the variants in brackets.
Bombsite A i Long 12
The bombsite itself
The long T route to A
The doors opening into Long
The stretch before the doors, on the T side
The corner before the site entrance
The sunken area on the left at the end of Long
The vehicle by A Cross
The stack at the A Short entrance
The gap behind the crates by default
The default plant spot
The open space between Short and Long
The CT ramp onto the site
Mid i Short 7
The doors in the middle of the map
The upper part of mid on the T side
The crate in mid
The mid stretch on the CT side
The platform leading to A Short
The short entrance to A
The drop from T Spawn onto Catwalk
Bombsite B and the tunnels 7
The bombsite itself
The upper part of the tunnels on the T side
The lower part of the tunnels at the B exit
The CT doors leading to B
The window above the site
The platform at the back of the site
The large crate on site
Spawns 2
The attackers spawn
The defenders spawn
How to Play Dust 2?
Dust II is a simple map in theory, but unforgiving of mistakes. Long angles, strong sniper positions, and a clear layout give a well-positioned CT a real advantage. If the defense plays patiently and doesn't give up control for free, T has to work hard.
CT - Long and Mid is everything
On Dust II, controlling the long and mid lanes is fundamental.
Standard:
1 x B anchor
1 x mid doors
1 x short
2 x long
If you lose the long without a fight, the site becomes difficult to maintain.
If you give up the mid, the short starts to fall apart.
You don't always have to push. All you need to do is:
early utility on long
info from mid
communication between short and A site
A site - patience wins rounds
The biggest CT mistake on A? Unnecessary peeking.
If you play:
long dig / place → play on info and trade
short → control your pace, don't lean without support
AWP → change position after each shot
Dust II rewards patience. T often waits for a mistake. Don't give it to them.
B site - a lonely island
B is the most difficult position mentally.
B Player must:
manage utility well
not be the first to die
communicate pressure from upper tunnels
Retaking B is possible if the mid is alive and provides support.
If the mid falls early, B becomes very difficult to retake and easy to capture. Unless the rotation reacts quickly enough.
T side - without mid control, it's difficult
Dust II forces a fight for mid.
Strongest moves:
long control → split A
mid to B split
slow pace and extracting utility from CT
A dry rush without preparation rarely works against a disciplined defense.