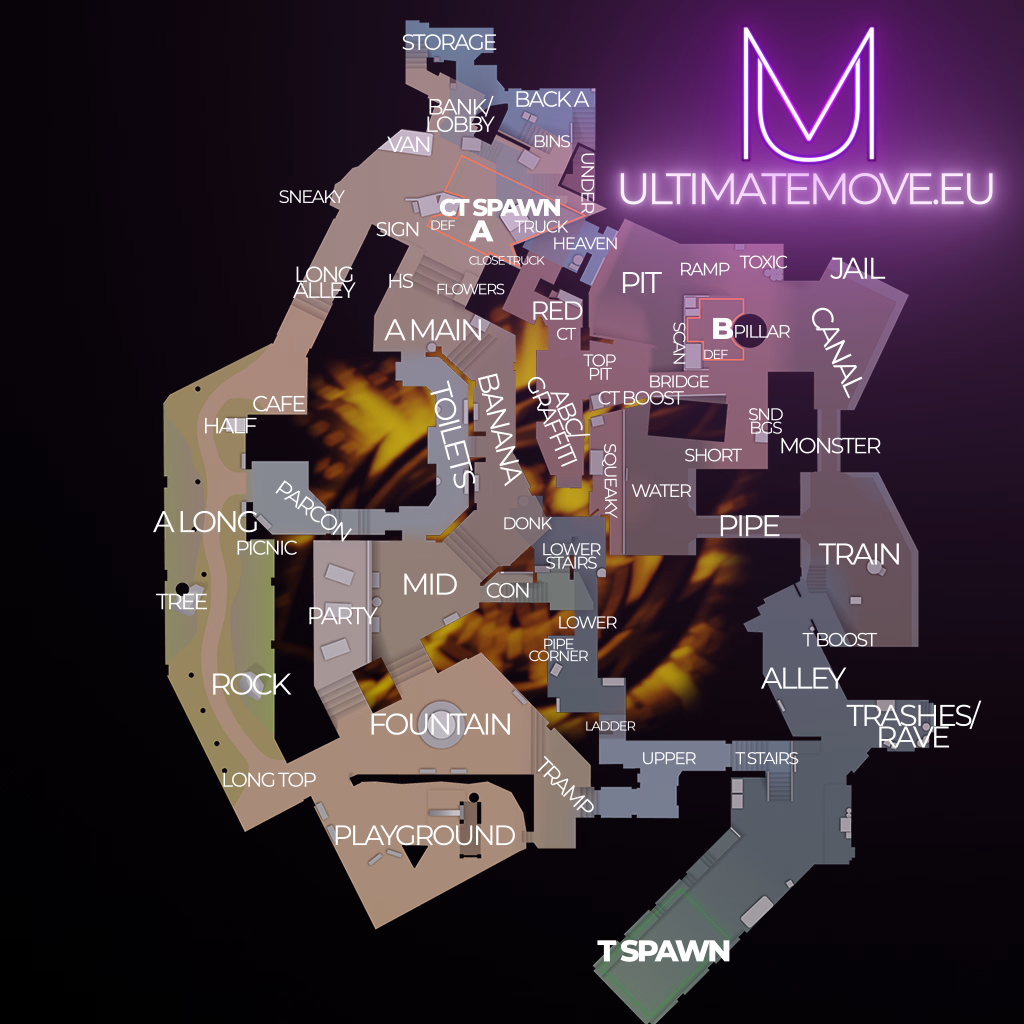



All Overpass callouts
A full list of positions by area, with the name variants you will hear in comms. The same spot goes by different names in different lobbies, so we give the variants in brackets.
Bombsite A 6
The bombsite itself, by the bank building
The building by the site
The long approach to the site
The short approach to the site
The default plant spot
The cover by the site
Bombsite B 7
The bombsite itself
The structure at the B entrance
The platform above the site
The channel by the site
The room next to the site
The pillar on the site
The CT approach towards B
Mid and approaches 6
The link between the two sides of the map
The area on the T side
A point on the route towards A
The sunken area on the approach to A
The cover by the passage
The steps down towards the site
Spawns 2
The attackers spawn
The defenders spawn
How to Play Overpass?
Overpass is a map that many people dislike because it punishes any lack of discipline. It is technical, sprawling, and heavily reliant on spatial control. If a team does not communicate well, it quickly falls apart. It is probably the most chess-like map of them all.
It's not as spectacular as Mirage or as simple as Dust II. It's a map for teams that think, analyze, and control space.
If it's not your favorite, it's often because it requires more patience than most maps.
But when you play it consciously, it starts to make sense.
CT - checking the map instead of standing on the site
The biggest mistake on Overpass is playing passively.
Standard:
2 x A
2 x B
1 x rotator
Key areas:
connector
short B
Long
If you give up the mid and connector without a fight, T gets a lot of freedom. Overpass requires active defense. Sometimes you have to go out for info, sometimes you have to close the distance.
This isn't a map where you can stand around for 90 seconds and wait.
A site - difficult to repel
And it's wide and open. If T executes well, he'll take the bank and the truck, and retaking it can be painful.
That's why you have to:
smoke early
delay the plant
play for trades
Everyone here has to work together, no sitting on the sidelines. Solo peeking ends in a quick 4v5, the map is too big for mistakes.
B site - short control is everything
B without shorts is practically impossible to maintain.
Anchor must:
play under info from connector
change tempo
don't give away the shorts for free
If CT holds short and has info from mid, B becomes much easier to defend.
T side - a map for the patient
Overpass rewards T, which doesn't look for W on the keyboard xD.
Strongest moves:
fountain control → split A
connector pressure → late B
slow pace and penalty for CT aggression
A dry rush without map control, with weak utility, either due to a lack of skill or a lack of money, rarely works.