
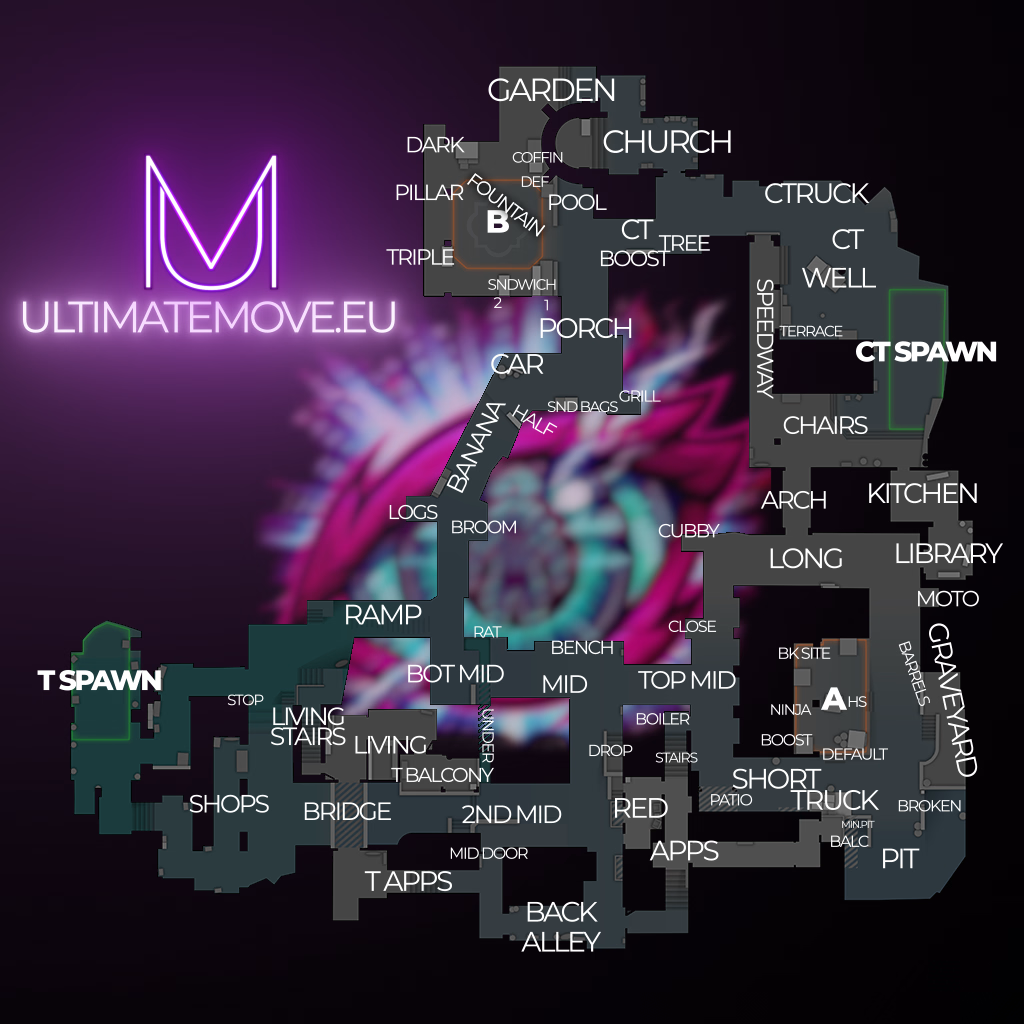





All Inferno callouts
A full list of positions by area, with the name variants you will hear in comms. The same spot goes by different names in different lobbies, so we give the variants in brackets.
Bombsite A and around it 10
The bombsite itself
The building leading T onto A
The Apartments exit onto the site
The sunken area on the right side of the site
The nook behind the site
The room by the site on the CT side
The passage linking Second Mid to A
The long approach to the site from Arch
The short approach from Apartments
The default plant spot
Mid 3
The middle of the map on the T side
The far part of mid by the Arch
The upper stretch of mid
Bombsite B i Banana 12
The bombsite itself
The main T approach to B
The vehicle halfway up Banana
The log pile on Banana
The cover at the Banana exit
The crate on the site
The crate on the opposite side of the site
The shaded corner by the site
The scaffolding on the site
The defenders position at the B exit
The first set of crates on Banana
The second set of crates, closer to the site
Spawns 2
The attackers spawn
The defenders spawn
How to Play Inferno?
Inferno has been one of the most tactical maps for years and is clearly closer to CT. Narrow passages, lots of choke points, and the enormous importance of utility mean that a disciplined defense can completely stop T here.
CT - checking the banana and the midfield is essential
Inferno is divided into two key zones: banana and mid.
Standard:
2 x B (banana control)
1 x arch
1 x short
1 x A site
If you give up the banana without a fight, B becomes a lottery.
If you give up the mid for free, A gets pressure from several sides.
At the beginning of the round:
early molotov banana
HE against the wall
sometimes aggression after utility
CT must show up. Passive play every round doesn't work.
A site - gra na delay i crossfire
And it's difficult to break through if CT plays together.
Arch + site + pit:
play for trades
don't stick your neck out solo under utility pressure
delay the plant as long as possible
Inferno rewards delay. Every 5 seconds is an advantage for the CT side.
B site - grenade management
B without utility is very difficult to maintain.
Key things to do:
Don't use all your grenades in the first 20 seconds.
Leave Molotov on execute/rotations
communicate banana pressure, lol
If T gets a banana and forces you to retreat without losses, you must be ready for a quick split.
T side - no banana, no game
The biggest mistake T makes is ignoring the banana.
You have to:
extract utilities
force CT to reverse
control the pace
Strongest moves:
banana control → late B execute
mid control → split A
slow pace and penalty for CT aggression
Inferno rewards patience on the T side, but CT still dictates the terms.